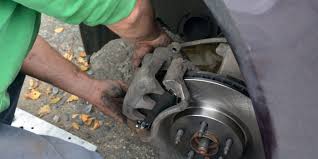
A step-by-step guide to brake calliper replacement for UK drivers — covering symptoms, costs, tools and when to call a professional.
Brake callipers are one of the most safety-critical components on your car, and a failing calliper can compromise your stopping power significantly. Whether you are a confident DIY mechanic or simply want to understand what a garage is telling you, this guide walks you through everything you need to know about brake calliper replacement on UK roads — from early warning signs to final brake bleeding.
Key Points
- Brake callipers clamp the pads against the disc to slow your car — any failure is a serious safety issue
- Common symptoms include pulling to one side, a spongy pedal, fluid leaks and uneven pad wear
- Always replace callipers in pairs on the same axle for balanced braking
- Costs range from approximately £40 DIY (parts only) to over £500 at a franchised dealer
- Bleeding the brakes after replacement is not optional — air in the system increases stopping distances
- A seized or leaking calliper will cause an automatic MOT failure under UK testing standards
What Is a Brake Calliper and What Does It Do?
The brake calliper is a hydraulic clamp mounted over the brake disc at each wheel. When you press the brake pedal, pressurised brake fluid forces one or more pistons inside the calliper outward, squeezing the brake pads against the spinning disc rotor. This friction converts kinetic energy into heat, slowing or stopping the vehicle.
Most UK passenger cars use a floating calliper design, where a single piston pushes one pad directly while the calliper body slides to pull the opposite pad in from the other side. Higher-performance vehicles may use fixed multi-piston callipers for greater stopping power and heat dissipation. Understanding which type your vehicle uses matters when sourcing replacement parts and choosing the correct wind-back tool.
Warning Signs Your Brake Calliper Needs Replacing
Catching a failing calliper early can prevent more expensive damage to your discs and pads — and keep you safe. Look out for these symptoms:
- Car pulling to one side under braking — the most common sign of a seized calliper on one wheel
- Spongy or soft brake pedal — caused by a leaking calliper seal introducing air into the hydraulic circuit
- Uneven or premature brake pad wear — one side wearing significantly faster than the other
- Visible brake fluid leak around the wheel or calliper body
- Persistent overheating wheel after driving — a dragging calliper keeps the pads in constant contact with the disc
- Squealing or grinding noise — especially under light or moderate braking
In my experience, a car that pulls noticeably to one side when braking almost always points to a seized calliper on the opposite wheel. This symptom becomes far more dangerous in wet conditions — a daily reality for most UK drivers — and should never be ignored.
If your dashboard warning light has come on alongside these symptoms, it is worth reading our guide on the spanner warning light and what it means for UK drivers.
Tools and Parts Required
Before starting, make sure you have everything to hand. Stopping halfway through a brake job is not an option.
| Item | Notes |
|---|---|
| Replacement brake calliper | Buy for the correct side — always replace in pairs |
| New brake pads | Strongly recommended when replacing callipers |
| Brake fluid (DOT 4) | Check your vehicle handbook for the correct spec |
| Piston wind-back tool | Essential for rear EPB callipers; a C-clamp works for front |
| Torque wrench and socket set | Guide pin bolts must be torqued to spec |
| Flare nut (brake line) spanner | Prevents rounding off the brake line fitting |
| Brake cleaner spray | For cleaning disc and calliper surfaces |
| Copper grease | Apply to pad backing plates only — never on friction surfaces |
| Jack, axle stands, wheel brace | Never work under a car on a trolley jack alone |
Always use a quality aftermarket or OEM-equivalent calliper. Unbranded units from unknown suppliers carry a real risk of premature seal failure and reduced clamping force.
Step-by-Step: Replacing a Brake Calliper
This process covers a standard front or rear floating calliper. Rear callipers with an Electronic Parking Brake (EPB) require a diagnostic tool to retract the piston electronically — if in doubt, have this done professionally.
- Loosen the wheel nuts slightly before jacking the vehicle. Engage the handbrake and place it securely on axle stands
- Remove the wheel and set it aside safely
- Open the brake fluid reservoir cap in the engine bay slightly to relieve system pressure — place a cloth underneath to catch any spill
- Disconnect the brake hose from the calliper using a flare nut spanner. Immediately plug or cap the open line to prevent fluid loss and contamination
- Remove the guide pin bolts — typically two hex or socket bolts, often with thread-lock applied. A firm, consistent turn rather than a sharp jerk works best
- Slide the old calliper off the disc. Use a rubber mallet to free it if it has seized in position
- Fit the new calliper onto the carrier bracket, ensuring the bleed nipple is at the top — this is essential for effective air removal during bleeding
- Torque the guide pin bolts to the manufacturer’s specification — typically 25–35 Nm for most passenger cars, but always verify in your service manual
- Reconnect the brake hose, tightening firmly but without overtorquing the fitting
- Fit new brake pads, applying a thin layer of copper grease to the back face of each pad and to the carrier contact points only
- Bleed the entire braking system — starting from the calliper furthest from the master cylinder and working towards the nearest
How to Bleed Brakes After Calliper Replacement
Brake bleeding is not optional after any calliper work — it removes air from the hydraulic circuit that would otherwise cause a dangerously soft pedal. There are two main approaches available to UK home mechanics:
- Two-person method: One person slowly pumps the brake pedal while the other opens the bleed nipple on the calliper. Close the nipple before the pedal reaches the floor, then repeat until fluid runs clear and bubble-free
- One-man vacuum bleed kit: A hand-held vacuum pump attaches to the bleed nipple and draws fluid through. Available from most UK motor factors for around £15–£30 and perfectly adequate for home use
Always keep the brake fluid reservoir topped up throughout the process and never allow it to run dry — this will introduce air back into the system from the top. Use only fresh DOT 4 fluid, or the grade specified in your vehicle’s handbook.
Replace in Pairs: Why Both Callipers Matter
From my point of view, one of the most common mistakes DIY mechanics make is replacing only the calliper that has failed and leaving the original unit on the opposite side of the axle. Callipers on the same axle degrade at comparable rates, and pairing a brand-new unit with a worn one creates an imbalance in clamping force. This causes the vehicle to pull under braking — potentially severely — and will likely result in uneven pad wear again within a short period.
The same principle applies to brake pads and, where applicable, brake shoes on drum-equipped axles. Balanced braking across an axle is fundamental to vehicle stability, particularly during emergency stops or when braking on wet or uneven UK road surfaces.
Brake Calliper Replacement Costs in the UK
| Replacement Option | Estimated Cost (per axle) | Notes |
|---|---|---|
| Franchised dealership | £300–£600 | OEM parts, highest labour rates |
| Independent garage | £150–£350 | Quality varies — always check reviews |
| DIY (parts only) | £40–£120 | Requires tools and mechanical confidence |
| Rear EPB calliper (garage) | £250–£500 | Specialist diagnostic tool required |
Prices are approximate UK market estimates for 2026. Always request a written quote before authorising any brake work.
For context on UK road safety enforcement and what a defective braking system could mean for your licence, see our guide on UK driving licence points and what happens at 12 points.
DIY or Professional? Making the Right Call
Brake calliper replacement sits in the intermediate DIY category. It is within reach of a confident home mechanic with the right tools and a vehicle-specific workshop manual, but it is not suitable for a complete beginner. The consequences of an error on a safety-critical braking component are severe.
I would recommend attempting this job yourself only if you have previous experience with brake pad replacement and basic suspension work, have access to a torque wrench and the correct tools, and can bleed the system properly afterwards. If there is any doubt, the cost of a professional replacement is modest compared to the risk. According to the UK government’s MOT testing standards, braking efficiency and balance are assessed at every annual test — a seized or leaking calliper is an automatic failure.
How do I know if my brake calliper is seized?
The most common signs are a car that pulls to one side under braking, a wheel that is noticeably hotter than the others after a drive, and brake pads that wear down much faster on one side. A seized calliper keeps the pads in constant contact with the disc even when you are not braking.
Can I drive with a faulty brake calliper?
No. A faulty calliper is a serious safety hazard and may also be illegal under the Road Traffic Act 1988. It will cause an automatic MOT failure and significantly increases your stopping distance. The vehicle should not be driven until the calliper is replaced.
Do I need to replace brake pads when changing callipers?
It is strongly recommended. Worn pads fitted into a new calliper will perform poorly and may be uneven in thickness compared to the opposite side. Replacing pads and callipers together at the same time is more cost-effective and ensures the whole system performs consistently.
What brake fluid should I use in the UK?
Most UK passenger cars require DOT 4 brake fluid. However, some vehicles — particularly older models or certain German brands — specify DOT 5.1. Always check your vehicle handbook before purchasing, as mixing incompatible fluid grades can damage seals and reduce boiling point.
Will replacing brake callipers affect my MOT?
Yes — positively, if the original calliper was seized or leaking. A correctly fitted new calliper, properly bled and with balanced braking force across the axle, will help your vehicle pass the braking efficiency test. Failing to replace in pairs can still result in a fail if imbalance is detected.
How long does a brake calliper replacement take?
For a mechanically experienced DIY mechanic, a single axle (two callipers) typically takes two to three hours including bleeding. A professional garage can usually complete the same job in one to one and a half hours.
What is the difference between a brake calliper and a brake pad?
The brake pad is the replaceable friction material that presses against the disc. The brake calliper is the hydraulic housing that holds the pads and contains the pistons that push them. Pads are a routine service item replaced every 30,000–50,000 miles; callipers last much longer but can fail due to seized pistons, corroded guides, or leaking seals.
Conclusion
Replacing brake callipers is one of the more rewarding intermediate DIY jobs you can tackle — it directly improves safety, restores braking balance and can save a meaningful amount compared to main dealer prices. The key principles are straightforward: always replace in pairs, torque every bolt to specification, bleed the system thoroughly, and use quality parts. In my experience, drivers who invest time in understanding their braking system are less likely to be caught out by sudden failures — and far better prepared when the annual MOT comes around. If you are also looking at wider suspension health, it is worth pairing a calliper check with an inspection of your wheel bearings and steering components for a comprehensive service.