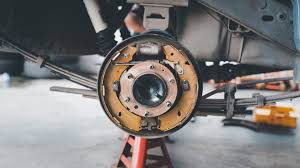
A step-by-step guide to drum brake shoe replacement for UK drivers — covering symptoms, costs, adjustment procedures and when to seek professional help.
Drum brakes and brake shoes are less common on modern UK cars than disc brakes, but they remain widely used on the rear axles of smaller and budget-oriented vehicles — including many popular city cars, superminis and older family hatchbacks still in daily use across the UK. When brake shoes wear out, braking performance on the rear axle deteriorates progressively, often without the obvious squealing that worn disc pads produce. This guide covers everything UK drivers need to know about recognising, replacing and correctly adjusting rear brake shoes.
Key Points
- Brake shoes are the friction components inside a drum brake system, pressed outward against the drum to slow the car
- They wear more slowly than disc pads — typically lasting 80,000–100,000 miles — but require replacement when the lining reaches minimum thickness
- Symptoms include a pulling sensation under braking, a grinding noise, a high-effort handbrake and reduced rear braking force
- Always replace shoes in pairs on the same axle and inspect the drum for scoring at the same time
- The job requires careful spring management — drum brake components are under significant tension
- Drum brakes must be adjusted after shoe replacement to set the correct running clearance
How Drum Brakes Work
A drum brake consists of a steel drum that rotates with the wheel, and two curved brake shoesmounted on a fixed backplate inside the drum. Each shoe carries a bonded or riveted friction lining on its outer face. When the brake pedal is pressed, a wheel cylinder pushes the shoes outward against the inner surface of the rotating drum, generating friction that slows the wheel. The handbrake on most UK rear drum systems operates mechanically, pulling the shoes outward via a cable and lever — making the condition of the rear shoes directly relevant to handbrake effectiveness and MOT compliance.
Unlike disc brakes, drum brakes incorporate a self-adjusting mechanism on most modern vehicles — a ratchet or adjuster wheel that automatically compensates for lining wear by incrementally expanding the shoe-to-drum clearance. On older or neglected systems, this adjuster can seize, causing the shoes to run with excessive clearance and producing a characteristically soft, low-effort brake pedal.
Symptoms of Worn Brake Shoes
Drum brake wear is often gradual and easy to miss. Look for these warning signs:
- Grinding or scraping noise from the rear when braking — the metal shoe backing contacting the drum directly
- Pulling to one side under braking — one shoe worn more than the other, or a seized wheel cylinder on one side
- High handbrake travel — needing to pull the handbrake lever excessively before it holds, often linked to worn shoes or a seized adjuster
- Soft or spongy rear brake feel — associated with a leaking wheel cylinder, which should be inspected alongside the shoes
- Reduced overall braking efficiency — particularly noticeable during emergency stops
- Brake dust or black residue inside the wheel — indicates advanced lining wear or a leaking wheel cylinder contaminating the shoes
From my experience, a handbrake that requires more than 6–8 clicks to fully engage on a UK MOT test is almost always linked to worn rear shoes or a seized adjuster — and it is one of the most common advisory notes on older UK hatchbacks and city cars. If your handbrake warning light is illuminating unexpectedly while driving, our guide on the handbrake warning light and how to fix it explains the related causes in detail.
What You Will Need
| Item | Notes |
|---|---|
| Replacement brake shoes | Always replace as an axle set — never one side only |
| Brake drum (if worn or scored) | Measure drum internal diameter — replace if beyond maximum oversize |
| Wheel cylinder (if leaking) | Inspect carefully — a contaminated shoe must not be reused |
| Brake spring tool / hook | Essential — springs are under high tension and dangerous without the right tool |
| Brake adjuster tool or flathead screwdriver | For setting shoe-to-drum clearance |
| Brake cleaner spray | Clean all components before reassembly — never use compressed air on brake dust |
| High-temperature copper or ceramic grease | Apply to shoe contact points on backplate only — never on friction surfaces |
| Torque wrench and socket set | Wheel nuts and hub components must be torqued correctly |
| Jack, axle stands, wheel brace | Safe elevation essential for underbody access |
Never use compressed air to clean brake dust — older friction materials may contain asbestos, and even modern dust is an inhalation hazard. Use brake cleaner spray in a well-ventilated area and wear a dust mask.
Step-by-Step: Replacing Rear Brake Shoes
Drum brake assemblies vary between manufacturers, but the following procedure applies to the majority of rear drum systems found on UK passenger cars.
- Chock the front wheels and release the handbrake. Jack the vehicle and place on axle stands. Remove the rear wheel
- Remove the brake drum — on most UK cars it is retained by the wheel studs alone and pulls straight off once the wheel is removed. If it is stuck, apply penetrating fluid around the hub and tap the drum face gently with a rubber mallet. Do not strike the drum heavily — they are cast iron and can crack
- Photograph the assembly before touching anything — drum brake springs, levers and adjusters are complex and vary between vehicles. A clear reference photo before disassembly is invaluable
- Remove the shoe return springs using a brake spring tool — do not attempt this with pliers as the springs are under significant tension and can cause injury
- Remove the shoe retaining pins and clips — these pass through the backplate and retain each shoe with a spring-loaded cap. Press, rotate 90° and release
- Disconnect the handbrake cable from the trailing shoe lever, then remove both shoes as an assembly
- Inspect the wheel cylinder for leaks — any sign of brake fluid weeping from the rubber boots requires cylinder replacement before refitting new shoes
- Clean the backplate with brake cleaner and apply a thin film of high-temperature copper grease to the six raised contact points where the shoes bear against the plate — these are the only areas that should receive grease
- Transfer the adjuster, handbrake lever and any other hardware from the old shoes to the new ones, or fit new components from the kit
- Fit the new shoes in reverse order — handbrake cable first, then retaining pins and clips, then return springs. Ensure the longer leading shoe is positioned correctly per the vehicle-specific reference photo
- Refit the brake drum and rotate it by hand — it should turn with light resistance and no grinding
- Adjust the shoes by turning the adjuster wheel (accessible through a slot in the backplate or drum) until the drum just begins to bind, then back off slightly until it rotates freely with light drag
- Refit the wheel, lower the vehicle and pump the brake pedal firmly several times to seat the shoes before driving. Apply and release the handbrake several times to allow the self-adjuster to set
Inspecting and Measuring the Brake Drum
New shoes fitted into a worn or scored drum will not perform correctly and will wear rapidly. Before refitting the drum, inspect the internal friction surface carefully:
| Condition | Action |
|---|---|
| Light surface rust (normal after standing) | Clean with brake cleaner — acceptable |
| Light scoring or grooves | Measure internal diameter — within spec, reuse |
| Deep scoring or heat cracks | Replace drum — do not reuse |
| Blue heat discolouration | Replace drum — structural integrity compromised |
| Internal diameter at or beyond maximum oversize | Replace drum — cannot be machined further |
Most brake drums have the maximum internal diameter stamped or cast into the drum face. If the drum has worn beyond this figure, it must be replaced regardless of surface condition. A drum worn beyond maximum oversize has reduced wall thickness and reduced thermal capacity — both safety concerns at MOT and in normal use.
Drum vs Disc Brakes: A Comparison
| Drum Brakes | Disc Brakes | |
|---|---|---|
| Common position on UK cars | Rear axle (smaller/older cars) | Front axle (all cars); rear (most modern cars) |
| Shoe/pad lifespan | 80,000–100,000 miles | 30,000–60,000 miles |
| Self-adjustment | Built-in on most modern systems | Via calliper piston travel |
| Heat dissipation | Poor (enclosed system) | Good (open disc) |
| DIY complexity | Higher (spring management) | Moderate |
| Handbrake integration | Integral | Via separate mechanism or EPB |
For drivers whose cars use disc brakes all round — including most modern UK family cars and SUVs — our companion guide on how to replace brake callipers covers the equivalent procedure for disc brake systems.
Brake Shoe Replacement Costs in the UK
| Vehicle Type | Typical Garage Cost (per axle) | DIY Parts Cost |
|---|---|---|
| Small city car (e.g. Fiat 500, Toyota Aygo) | £60–£120 | £15–£35 |
| Small hatchback (e.g. Ford Fiesta, VW Polo) | £70–£130 | £20–£45 |
| Family hatchback (e.g. Ford Focus, Vauxhall Astra) | £80–£150 | £25–£55 |
| Including drum replacement | Add £30–£80 | Add £20–£50 |
Prices are approximate 2026 UK market estimates. Wheel cylinder replacement, if required, adds approximately £40–£80 to garage costs.
A failed handbrake or binding rear drum brake is an automatic MOT failure under UK government MOT testing standards. Given the relatively low cost of shoe replacement compared to an MOT retest fee and the inconvenience of a failure, proactive replacement at signs of wear is strongly advisable.
DIY or Professional Replacement?
Brake shoe replacement is more complex than disc pad replacement due to the spring management, adjuster setup, and the importance of correct shoe orientation. That said, it is well within the capability of a careful and methodical home mechanic — provided they take a reference photograph before disassembly, use the correct spring tools, and take their time with the adjuster setup.
I would recommend drum brake shoe replacement as a DIY job for mechanics who have previously tackled disc brake work and are comfortable working carefully with spring-loaded components. The most common DIY mistakes are fitting the leading and trailing shoes in the wrong positions, insufficient grease on backplate contact points causing shoe squeal, and incorrect adjuster setup leading to handbrake MOT failure. For further guidance on UK braking system standards, Thatcham Research publishes relevant safety and testing information for UK-market vehicles.
How do I know if my brake shoes need replacing?
The most accessible check is to remove the rear wheel and drum and measure the lining thickness directly. Most brake shoes should be replaced when the friction lining reaches 1.5–2 mm in thickness. Audible grinding from the rear under braking is a strong indicator that the shoes have worn through to the metal backing.
Can I replace just one side’s brake shoes?
No. Brake shoes must always be replaced as a complete axle set — both sides simultaneously. Fitting new shoes on one side and leaving worn shoes on the other creates an imbalance in rear braking force that causes the car to pull under braking and will result in MOT failure.
How long do brake shoes last on a UK car?
Drum brake shoes typically last between 80,000 and 100,000 miles under normal use — significantly longer than disc brake pads. However, if the vehicle is regularly used for towing, carries heavy loads, or the handbrake is used aggressively, wear will be accelerated. Shoes contaminated by a leaking wheel cylinder must be replaced immediately regardless of thickness.
Do I need to replace the drum when fitting new shoes?
Not necessarily. If the drum is within its maximum oversize specification and shows no deep scoring, heat cracking or blue discolouration, it can be reused. However, if the drum is heavily grooved, a new drum is strongly recommended — worn drums reduce the contact area of new shoes and significantly extend the bedding-in period.
Will worn brake shoes cause an MOT failure?
Yes. Insufficient braking efficiency on the rear axle, excessive handbrake travel, and brake pull under test conditions will all cause an MOT failure. The handbrake must hold the vehicle on a gradient under UK MOT standards — worn shoes that prevent full handbrake engagement are one of the most common causes of MOT failure on older UK city cars.
What is the difference between brake shoes and brake pads?
Brake pads are flat friction components used in disc brake systems — they are clamped against a rotating disc by a calliper. Brake shoes are curved friction components used in drum brake systems — they are pushed outward against the inside of a rotating drum. Both perform the same function but operate on entirely different mechanical principles.
Why does my rear drum brake squeal after fitting new shoes?
Squealing after new shoe installation is almost always caused by insufficient copper or ceramic grease on the backplate contact points, or by brake dust or grease contamination on the friction surface. Remove the drum, clean all components with brake cleaner and re-apply grease to the backplate contact areas only — never to the lining or drum surface.
Conclusion
Brake shoe replacement is a straightforward but detail-oriented job that rewards patience and careful preparation. The spring management and adjuster setup are the aspects that separate it from a simple pad change, but neither is beyond a methodical home mechanic working from a vehicle-specific reference. Catching worn shoes before they grind into the drum saves the additional cost of drum replacement and avoids the safety and MOT compliance issues that follow from neglected rear brakes. In my experience, the best time to inspect drum brake shoes is during any tyre rotation or whenever the rear wheels are removed for another purpose — combining tasks reduces overall effort considerably. For a comprehensive rear axle service, pairing a shoe replacement with an inspection of your wheel bearings and brake callipers where applicable ensures the entire braking and suspension system is in peak condition for UK roads.